
Hello again cute people!
I have another block that I want to
show you how I
show you how I
have put together:)
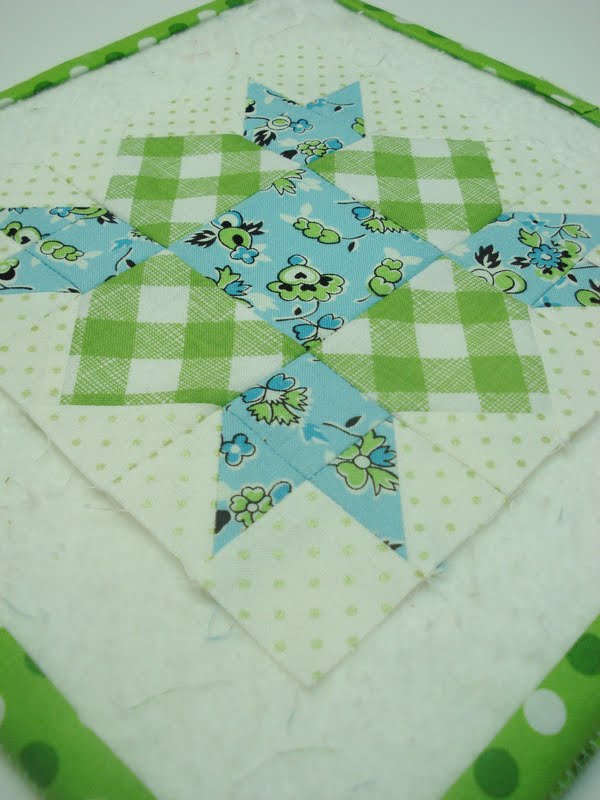
It's the weathervane block...
which is another traditional block that
is a favorite of mine!
This block becomes easy to sew once you apply the drafting and cutting methods that I have been showing you.
If you are new to my tutorials...instructions for drafting and cutting your own blocks are here.
I have also cut squares instead of triangles for making the half square triangle units. Instructions for that are
(the green gingham and the center square are
cut 2 1/2" and the rest are all 1 1/2")

Okay...now for a new lesson.
See the squares I have cut out of
green gingham?...
well...
instead of making flying geese and
then sewing them onto a rectangle to end up
in a square unit...(which is what most patterns calls for)...
Instead, I just cut squares in
the first place.
I simply added easy corner triangles onto the top corners of each square to get
the unit shape required.

So I cut 2 white squares for each
easy corner triangle on a green square.

Placed them RST ...

And stitched from corner to corner...

clothline stitching as I go.

I trimmed off the excess leaving an approximate 1/4" seam allowance...

And pressed toward the triangle.

Now for the other side....

same thing.


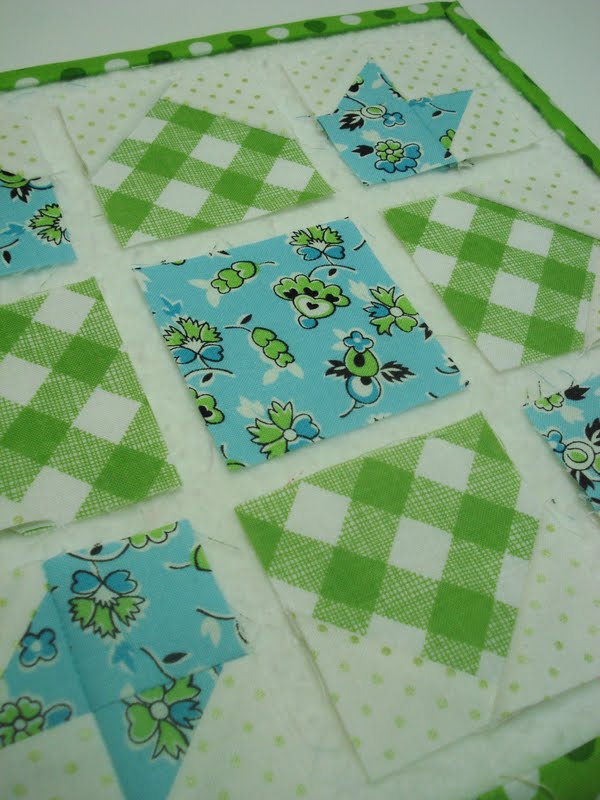
With the 4 green gingham
square units complete...

I move onto the blue units.
2 of the blue squares and 2 of the
background squares will become
half square triangles.


I pressed these seams open as I sometimes do with half square triangles this small.
It reduces bulk...therefore the block lays flat...which means it's a more accurate size.


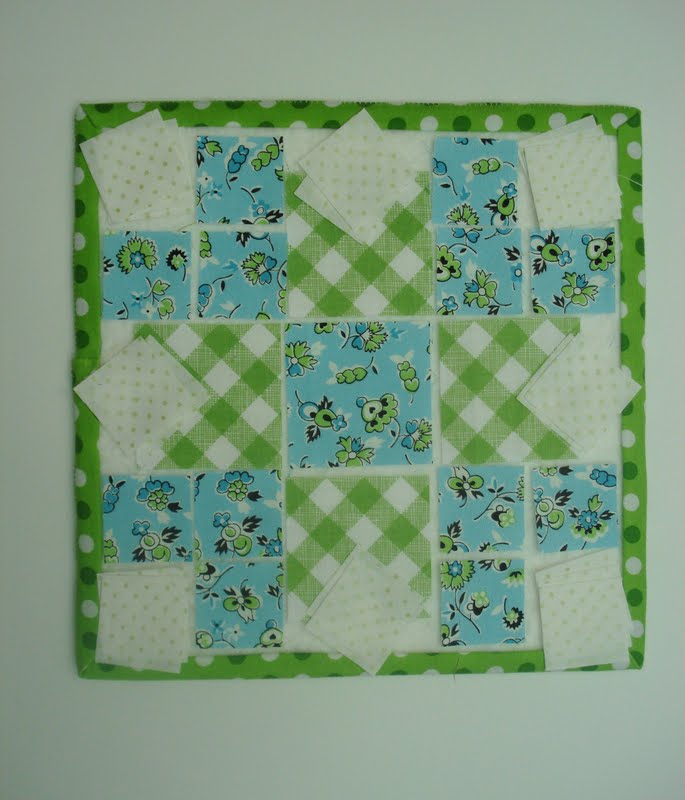
I laid all of the pieces out on my
It sure helps to make sure that everything is pointing in the right direction
before I continue!


I pressed these seams toward the square.


Once again...to reduce bulk...
I pressed this seam open.
I now have 9 squares to sew together
that are all the same size...
or in other words...
I have a 9 patch unit.

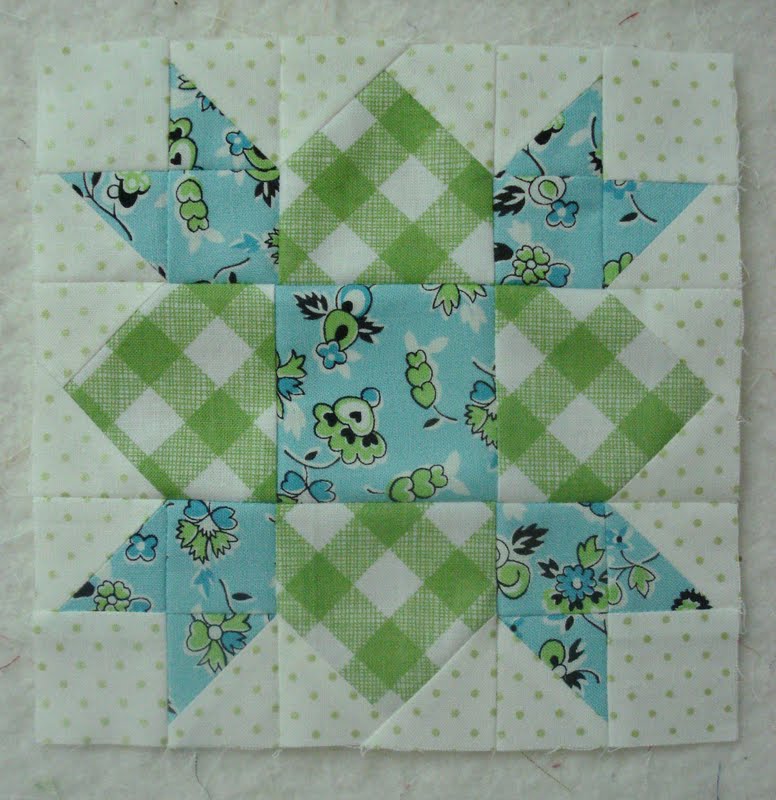
I sewed them into rows...
and then sewed the rows together...

And pressed the seams open.

I now have an accurate
6 1/2" x 6 1/2" (unfinished)
weathervane quilt block.
Fabric used;
Green Gingham = Sew Cherry
Blue Floral = DS Quilt Collection
White = Lakehouse Frosted Dot
I hope you're all enjoying my tutorials and that you are finding ways to use these easy methods on the other blocks that
you are making!
xx
Lori

29 comments:
Brilliant! Particularly love the extra tips about which way to press seams and when it's a good idea to press them open. Invaluable to newbies like me! Beautiful block too.
Thank you so much again for all these wonderful tutorials. :)
(Any good tips on 1/4 squares??)
S x
I am working hard to get accurate seam allowances and lining up points using your excellent tutorials (I am still on HST's). Is it OK to actually draw a line from corner to corner and stitch along that? My machine is not set down in a table and the extension table I have for the machine is very narrow at the front only 2" so I am finding it hard to be accurate all the way across. Does it matter if I draw a line or does it distort the fabric and makes it even more difficult getting accurate intersections?
Thanks again for the brilliant tutorials. I look forward to trying more of them once I get the HSTs to line up when putting the blocks together.
This is such a darling block. I have been working on a star quilt and I have had the worst timw with sewing the little blocks in the corner to make the points. When I press them open they just aren't square and I have to trim them. I don't know if I'm stretching them out with the iron or I'm getting the seam crooked (although it seems it comes out even worse if I draw a line to follow.) I line them up carefully and they just aren't right. Any tips?
I love everything about this block! The colors are just so perfect together and this tutorial is super easy to follow. Thank you and keep them coming :)
Love to follow along on these tutorials. Thanks you so much for sharing this with all of us. Judy C
Love the block and the colors too!
Thank you so much - what a great block tutorial.
Rita E in AZ
Lori - another EXCELLENT tutorial, I find myself so excited to see what is next. Thanks so much for doing this!
Lori...you are such a delight!It always makes my day to open your blog and read what you have to share!Thank you so much for all the inspiration you send our way.
Hugs, Mary Jo
I always love your fabric choices SOOO much. I do so appreciate you noting what fabric you are using. Right now I'm just using a tissue to wipe up the drool!! AWESOME STUFF!
Another awesome block...And the colors are great...Just love, love your tuts..Always learn something new..Look forward to the next block. It is just like Christmas!! Surprise!!!
Hi Lori -- thanks so much for showing the photos of the back of the block. I haven't been pressing my seams open -- I think that's why some of my blocks are not looking neat on the front.
You are so generous for taking the time to show us how to do this. Thank you so much!
You are a wonderful teacher! It looks so easy. Thank you for taking the time to show us.
Lovely weekend.
I really love your tutorials. I also love all the pictures. I'm a visual person, so the pictures help me a lot. Thanks for taking time to teach others online.
God bless you!! I had decided to do this block by paper piecing I had seen on another blog. This is sooooo much easier & faster. You are encouraging lots of people!
Beautiful block!
Thanks for taking a daunting block and making it look so inviting to make!
I'm making your mini demo boards right now and patting myself on the back because they are going to make everything so organized!!!
Oksy, made the mini design board..Easy Peasy!! Not, all the cutting went well, get out the glue gun and away we go, glued the batting easy peasy, now comes the trim...oh my what can I say, first I glued it to my shirt..got that undone, finished the first side turned it over to glue the second side..Well I glued it to the counter..Glued the nails..Ah finished..nothing like yours, but I do have one..On to the second one...Just love you ideas...
I can tell that next week is my week to get going on these blocks! I am so loving these tutes and can hear your voice in my mind. Thanks for being so YOU, always so generous with your talents and skills.
You are seriously one of the smartest people EVER!! Love your tutorial (!!!), love your block(!!!), and love your fabric choice!....and then you blog, too!!?
So pretty! And, as always, I LOVE the fabrics. You are so talented!
LOVE this weathervane block...think I need to make this one next!
Great tutorial, thanks for the tips.
I love your fabric choices. Very Fresh.
I am so happy to find your informative helpful awesome, need I say more blog! This is the best one yet. I didn't realize you designed sew cherry fabric line. Yea I already loved that now I am getting great information too!
Your generosity is sooo appreciated. I am making boards and adapting a few of your methods that just make sense. Thank you!
Cindy
Thanks so much for your wonderful tutorials! I'm learning sooooo much! I made my mini design boards today:)))))) They are adorable. Thank you, Friend!
Thanks so much for this tutorial. I love this block!
Nancy from joy for grace
I'm sorry if you get this twice. I didn't see it post and didn't notice whether you review before posting comments.
Anyway, I just wanted to tell you how much I love this little block you've shown us. I think it's one of my all-time favorites. Thanks, too, for the tutorial.
Nancy from joy for grace
Thanks! I just finished the block. I am making it for the barn QAL, but it is great knowing I am capable of making this size block. I have the Farmers Wife book and have been collecting fabrics to make it. Now back to the barn!
This is about the cutest little block ever. I cannot wait to make it and the barns!
Post a Comment